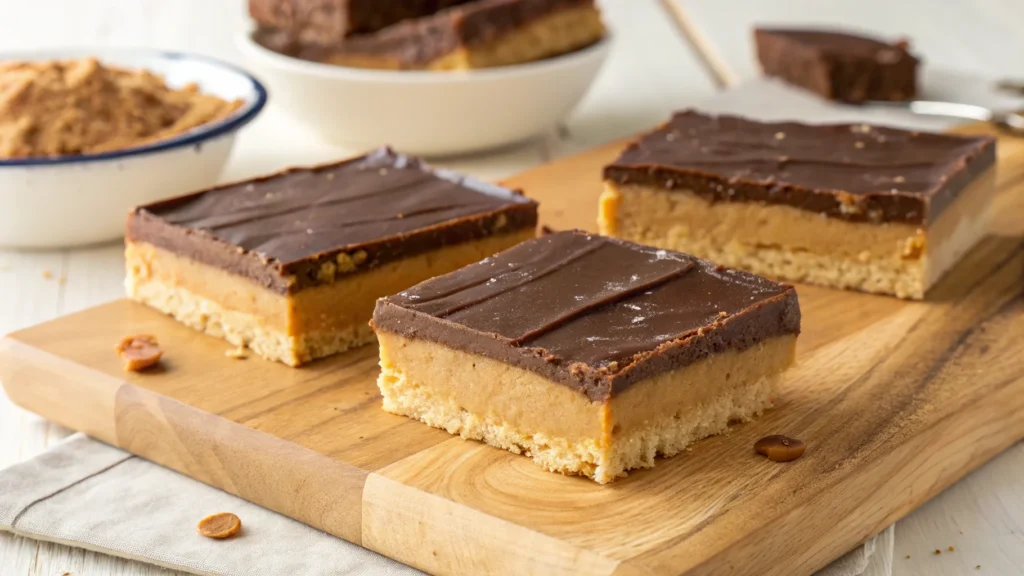
Lunch Lady Peanut Butter Bars are a nostalgic, school cafeteria-style dessert that many people remember from their childhood. These soft, chewy bars feature a delicious peanut butter base topped with a layer of rich chocolate, making them an irresistible treat for peanut butter lovers.
Originally served in school lunchrooms across America, these bars became a beloved staple due to their perfect combination of sweetness and texture. Today, they continue to be a favorite among families, bakers, and dessert enthusiasts who appreciate easy-to-make yet incredibly satisfying recipes.
In this article, we’ll explore everything about Lunch Lady Peanut Butter Bars, including their history, key ingredients, variations (such as no-bake versions and graham cracker adaptations), a step-by-step recipe, and storage tips. Whether you want to recreate your childhood favorite or discover new ways to enjoy this dessert, we’ve got you covered.
Love peanut butter desserts? Try our Thick and Chewy Peanut Butter Cookies for another irresistible treat!
Table of Contents
The Nostalgic School Cafeteria Treat
The Origins of Lunch Lady Peanut Butter Bars
The name “Lunch Lady Peanut Butter Bars” comes from their popularity in school cafeterias. In the 1960s and 1970s, cafeteria workers—affectionately known as “lunch ladies”—whipped up large batches of these treats to serve to students. These bars were an economical and delicious way to provide kids with a satisfying dessert made from simple ingredients.
Back then, school-made desserts were crafted from scratch, using pantry staples like peanut butter, sugar, flour, and chocolate. These bars quickly became a cafeteria favorite because they were easy to make in large quantities, had a soft yet chewy texture, and featured the beloved combination of peanut butter and chocolate.
Why These Bars Are a Crowd Favorite
Lunch Lady Peanut Butter Bars have stood the test of time because of their perfect balance of flavors and textures:
- Soft & Chewy Base: The peanut butter-infused cookie crust is tender yet sturdy enough to hold its shape.
- Creamy & Nutty Filling: A smooth peanut butter layer adds richness and depth.
- Decadent Chocolate Topping: A generous layer of melted chocolate brings everything together.
These bars are easy to customize, making them perfect for any occasion. Whether you prefer classic peanut butter bars, no-bake versions, or healthier alternatives, there’s a variation for everyone.
The History of Lunch Lady Peanut Butter Bars
Origins in School Lunchrooms
Lunch Lady Peanut Butter Bars trace their roots back to the mid-20th century, when school cafeterias focused on providing homemade, budget-friendly meals for students. These bars became a lunchtime staple because they used affordable, readily available ingredients like peanut butter, oats, and chocolate.
School lunch programs were designed to offer nutritious yet enjoyable meals, and desserts like these peanut butter bars helped make cafeteria food more appealing. Many lunch ladies took pride in their from-scratch baking, and their peanut butter bars became one of the most requested treats among students.
Why Peanut Butter Bars Became Popular
Several factors contributed to the rise in popularity of Lunch Lady Peanut Butter Bars:
- Simple Ingredients – Schools could easily source peanut butter, flour, sugar, and chocolate, making these bars cost-effective to prepare in large batches.
- Peanut Butter Craze – In the 20th century, peanut butter became a household staple, celebrated for its protein content and affordability. It was frequently used in school recipes to create filling, high-energy snacks.
- Perfect for Mass Production – Unlike delicate pastries, these bars could be made in sheet pans, cut into squares, and stored easily, making them ideal for cafeteria settings.
- Timeless Flavor Combination – The classic pairing of peanut butter and chocolate made them an instant hit, ensuring they remained a cafeteria classic for decades.
Over time, as home baking grew in popularity, families began recreating these bars at home. Today, Lunch Lady Peanut Butter Bars remain a nostalgic favorite, often shared at bake sales, potlucks, and family gatherings.
Looking for a lighter treat? Check out our Healthy Chocolate Chip Oatmeal Bars!
Key Ingredients and Variations
Essential Ingredients for Classic Lunch Lady Peanut Butter Bars
Lunch Lady Peanut Butter Bars are made using simple pantry staples, creating a perfectly chewy base, creamy peanut butter layer, and rich chocolate topping. Here’s what you’ll need:
1. Peanut Butter Cookie Base
This foundation provides a soft yet slightly firm texture to hold the layers together.
- Butter – Adds richness and moisture.
- Brown sugar & granulated sugar – Create a soft, chewy consistency.
- Eggs – Act as a binding agent for structure.
- Peanut butter – Gives the bars their signature nutty flavor.
- Vanilla extract – Enhances sweetness and depth.
- Flour – Provides stability and texture.
- Baking soda & salt – Help with leavening and balance flavors.
2. Peanut Butter Filling
A smooth, creamy layer that enhances the peanut butter flavor.
- Peanut butter – Creates a rich, nutty layer.
- Powdered sugar – Adds sweetness and firmness.
- Milk or cream – Adjusts the texture to a spreadable consistency.
3. Chocolate Topping
A glossy chocolate layer that seals everything together.
- Chocolate chips (semi-sweet or milk chocolate) – Melted to form a smooth top.
- Butter or coconut oil – Helps create a shiny, spreadable consistency.

Simple ingredients used to make Lunch Lady Peanut Butter Bars.
Popular Variations of Lunch Lady Peanut Butter Bars
This beloved dessert can be customized in multiple ways to fit different tastes and dietary needs.
1. No-Bake Lunch Lady Peanut Butter Bars
A quick, hassle-free version that doesn’t require an oven.
- Instead of a baked base, a mix of graham crackers, peanut butter, butter, and powdered sugar is pressed into the pan and chilled before adding the chocolate layer.
2. Graham Cracker Peanut Butter Bars
A variation that adds a slightly crunchy texture and a hint of honey flavor.
- Crushed graham crackers replace some or all of the flour in the cookie base.
- The bars have a firmer bite compared to the traditional version.
3. Healthier Peanut Butter Bars
A better-for-you version with lighter ingredients.
- Uses natural peanut butter (without added sugars or oils).
- Oat flour or almond flour replaces refined white flour.
- Honey, maple syrup, or coconut sugar instead of processed sugar.
- Dark chocolate instead of milk chocolate for less sugar and more antioxidants.
4. Lunch Lady Peanut Butter Bars with Frosting
A richer twist that replaces the chocolate topping with a thick peanut butter frosting.
- The frosting is made from peanut butter, butter, powdered sugar, and milk, creating a creamy, bakery-style finish.
Comparison Table: Lunch Lady Peanut Butter Bar Variations
| Variation | Key Ingredients | Unique Features |
|---|---|---|
| Classic Peanut Butter Bars | Peanut butter, butter, brown sugar, flour, eggs, chocolate | Soft, chewy texture with a rich peanut butter flavor |
| No-Bake Peanut Butter Bars | Graham crackers, peanut butter, butter, powdered sugar, chocolate | No oven required; chilled for a firm texture |
| Graham Cracker Peanut Butter Bars | Graham cracker crumbs, peanut butter, butter, flour, sugar, chocolate | Adds a crisp texture and a subtle honey-like flavor |
| Healthier Peanut Butter Bars | Natural peanut butter, oat flour, coconut sugar, dark chocolate | Lower in sugar, uses whole-grain or gluten-free options |
| Peanut Butter Bars with Frosting | Peanut butter, butter, powdered sugar, milk, vanilla | Replaces chocolate topping with a creamy peanut butter frosting |
These variations allow you to tailor Lunch Lady Peanut Butter Bars to your preferences while keeping their iconic flavors and textures intact.
Want more peanut butter flavor? Try our Peanut Butter Cake with Peanut Butter Frosting!
Step-by-Step Recipe Guide
Now that we’ve covered the ingredients and variations, let’s dive into the step-by-step process of making classic Lunch Lady Peanut Butter Bars from scratch.
Ingredients for Classic Lunch Lady Peanut Butter Bars
For the Peanut Butter Base
- 1 cup butter (softened)
- 1 cup brown sugar
- 1 cup granulated sugar
- 2 large eggs
- 1 teaspoon vanilla extract
- 1 cup peanut butter (creamy or crunchy)
- 2 cups all-purpose flour
- 1 teaspoon baking soda
- ½ teaspoon salt
For the Peanut Butter Filling
- ½ cup peanut butter
- 1 cup powdered sugar
- 2 tablespoons milk or cream
For the Chocolate Topping
- 2 cups semi-sweet or milk chocolate chips
- 2 tablespoons butter or coconut oil
Step 1: Prepare the Peanut Butter Cookie Base
- Preheat the oven to 350°F (175°C) and grease a 9×13-inch baking pan or line it with parchment paper.
- In a large mixing bowl, cream together the butter, brown sugar, and granulated sugar until light and fluffy.
- Add the eggs, vanilla extract, and peanut butter, mixing until smooth.
- In a separate bowl, whisk together the flour, baking soda, and salt.
- Gradually add the dry ingredients to the wet mixture, stirring until fully combined.
- Spread the batter evenly into the prepared pan and bake for 18-22 minutes, or until golden brown.
Step 2: Prepare the Peanut Butter Filling
- While the base is baking, combine peanut butter, powdered sugar, and milk in a small bowl.
- Stir until smooth and spreadable. If the mixture is too thick, add a little more milk.
- Once the base has cooled slightly, spread the peanut butter filling evenly over the surface.
Step 3: Prepare the Chocolate Topping
- In a microwave-safe bowl, combine the chocolate chips and butter.
- Microwave in 30-second intervals, stirring each time, until fully melted and smooth.
- Pour the melted chocolate over the peanut butter layer and spread it evenly with a spatula.
Step 4: Set and Serve
- Allow the bars to cool at room temperature for about 20 minutes, then transfer to the refrigerator for at least 1 hour to set the chocolate.
- Once set, cut into squares or bars and enjoy!
Baking Tips for the Perfect Peanut Butter Bars
| Tip | Why It’s Important |
|---|---|
| Use creamy peanut butter | Ensures a smooth, even texture in the filling. |
| Don’t overbake the base | The bars will continue to firm up as they cool. |
| Let the bars chill completely | This prevents the chocolate layer from cracking when sliced. |
| Use parchment paper | Makes it easier to lift and cut the bars cleanly. |
Alternative Methods: No-Bake & Graham Cracker Versions
Want to try a different take on these bars? Here’s how you can modify the recipe:
No-Bake Peanut Butter Bars
- Skip the oven and replace the cookie base with a mixture of graham cracker crumbs, peanut butter, butter, and powdered sugar.
- Press the mixture into a pan, chill for 30 minutes, then follow with the peanut butter and chocolate layers.
Graham Cracker Peanut Butter Bars
- Swap out 1 cup of flour for 1 cup of finely crushed graham crackers for a slight crunch and honey flavor.
- The rest of the recipe remains the same!
Pair your peanut butter bars with our rich and comforting Bread Pudding Recipe!

Pressing the peanut butter base into the baking pan.
Lunch Lady Peanut Butter Bars with Graham Crackers
If you love the classic Lunch Lady Peanut Butter Bars, but want to add a bit of crunch and extra flavor, then the graham cracker version is a must-try. Using graham crackers instead of some (or all) of the flour adds a light crispiness and a subtle honey undertone, making these bars even more delicious.
Why Use Graham Crackers?
Graham crackers bring a unique texture and flavor profile to peanut butter bars. Here’s why they work so well:
- Adds Crunch – Instead of a completely soft base, crushed graham crackers create a light, crispy texture.
- Naturally Sweet – Graham crackers contain a mild honey-cinnamon flavor, which complements peanut butter and chocolate beautifully.
- No Baking Required – If you use graham crackers as the entire base, you can make a no-bake version, saving time and effort.
- Stronger Structure – Crushed graham crackers help create a firmer, more compact bar that holds its shape better.
Graham Cracker Peanut Butter Bars Recipe
Ingredients
For the Base
- 1 cup graham cracker crumbs (about 8 full crackers, finely crushed)
- 1 cup butter (melted)
- ½ cup brown sugar
- ½ cup granulated sugar
- 1 cup peanut butter
- 1 teaspoon vanilla extract
- 1 ½ cups all-purpose flour (or substitute with more graham crackers for a no-bake version)
- 1 teaspoon baking soda
- ½ teaspoon salt
For the Peanut Butter Layer
- ¾ cup peanut butter
- 1 cup powdered sugar
- 2 tablespoons milk or cream
For the Chocolate Topping
- 2 cups semi-sweet chocolate chips
- 2 tablespoons butter or coconut oil
Step 1: Prepare the Graham Cracker Base
For a baked version:
- Preheat oven to 350°F (175°C) and grease a 9×13-inch baking pan.
- In a bowl, mix graham cracker crumbs, butter, brown sugar, and granulated sugar until combined.
- Stir in peanut butter, vanilla extract, and eggs, mixing until smooth.
- Gradually add flour, baking soda, and salt, stirring until fully combined.
- Press the mixture into the baking pan and bake for 15-18 minutes until golden brown.
For a no-bake version:
- Skip the oven and combine graham cracker crumbs, melted butter, peanut butter, and powdered sugar in a bowl.
- Stir well until fully mixed, then press firmly into a lined baking pan.
Step 2: Make the Peanut Butter Filling
- In a small bowl, mix peanut butter, powdered sugar, and milk until smooth.
- Spread evenly over the slightly cooled base.
Step 3: Add the Chocolate Topping
- Melt chocolate chips and butter in the microwave in 30-second intervals, stirring in between until smooth.
- Pour the melted chocolate over the peanut butter layer and spread evenly with a spatula.
Step 4: Chill and Serve
- Let the bars cool at room temperature for 20 minutes, then refrigerate for at least 1 hour to allow the chocolate to set.
- Slice into squares and enjoy!
Baked vs. No-Bake: Which Version is Better?
| Feature | Baked Version | No-Bake Version |
|---|---|---|
| Texture | Soft and chewy with a slight crunch | Firmer, more compact with a crisp bite |
| Effort | Requires baking (15-18 minutes) | Quick and easy, no oven needed |
| Flavor | Deep, caramelized peanut butter taste | Lighter with a natural honey-graham flavor |
| Best For | Traditional peanut butter bar lovers | Quick desserts and summer treats |
Both methods taste amazing, so the best choice depends on your preference and available time.
Pro Tips for Perfect Graham Cracker Peanut Butter Bars
✅ Use finely crushed graham crackers – For a smooth texture, use a food processor or place crackers in a ziplock bag and crush with a rolling pin.
✅ For a crunchier base, reduce peanut butter slightly – A little less peanut butter keeps the base more crisp instead of chewy.
✅ Refrigerate before cutting – This ensures clean, sharp slices without crumbling.
✅ Try cinnamon or honey graham crackers – These add a new layer of flavor to the bars.
This graham cracker version of Lunch Lady Peanut Butter Bars adds a unique twist to the classic recipe, making them even more irresistible.
For another nutritious treat, try our Cottage Cheese Blueberry Bake!
Healthier Alternatives for Lunch Lady Peanut Butter Bars
If you love Lunch Lady Peanut Butter Bars but want a healthier version, there are plenty of ways to modify the classic recipe without sacrificing flavor. By swapping out a few key ingredients, you can reduce sugar, unhealthy fats, and refined carbs, while keeping the same rich peanut butter and chocolate taste.
How to Make Healthier Peanut Butter Bars
Here are some easy ingredient swaps to make these bars more nutritious:
| Traditional Ingredient | Healthier Alternative | Why It Works |
|---|---|---|
| White flour | Oat flour or almond flour | Adds fiber and nutrients |
| Butter | Coconut oil or Greek yogurt | Reduces saturated fat |
| Granulated sugar | Honey, maple syrup, or coconut sugar | More natural sweetness, lower glycemic impact |
| Processed peanut butter | Natural peanut butter (no added sugar or oils) | Less sugar and no artificial ingredients |
| Milk chocolate | Dark chocolate (70% cocoa or higher) | More antioxidants, less sugar |
| Powdered sugar (for filling) | Unsweetened coconut or blended dates | Natural sweetness without refined sugar |
Healthy Peanut Butter Bars Recipe
Ingredients
For the Base
- 1 cup natural peanut butter (unsweetened)
- ½ cup coconut oil (melted) or Greek yogurt
- ⅓ cup honey or maple syrup
- 1 teaspoon vanilla extract
- 2 cups oat flour (or almond flour for a grain-free option)
- ½ teaspoon baking soda
- ¼ teaspoon salt
For the Peanut Butter Layer
- ½ cup peanut butter
- ¼ cup unsweetened shredded coconut (or blended dates)
For the Chocolate Topping
- 1 ½ cups dark chocolate chips (70% cocoa or higher)
- 1 tablespoon coconut oil
Step-by-Step Instructions
Step 1: Prepare the Healthy Base
- Preheat the oven to 350°F (175°C) and grease or line a 9×13-inch baking pan.
- In a large bowl, mix peanut butter, coconut oil (or Greek yogurt), honey, and vanilla extract until smooth.
- Add oat flour, baking soda, and salt, stirring until well combined.
- Press the mixture into the prepared pan and bake for 12-15 minutes until lightly golden brown.
(For a no-bake version, simply refrigerate the base for 30 minutes instead of baking.)
Step 2: Add the Peanut Butter Layer
- In a small bowl, combine peanut butter and shredded coconut (or blended dates).
- Spread evenly over the cooled base.
Step 3: Make the Dark Chocolate Topping
- In a microwave-safe bowl, melt dark chocolate chips and coconut oil in 30-second intervals, stirring in between.
- Pour the melted chocolate over the peanut butter layer and spread evenly.
Step 4: Chill and Slice
- Allow the bars to cool at room temperature for 15-20 minutes, then refrigerate for at least 1 hour to fully set.
- Slice into squares and enjoy!
Why These Bars Are Healthier
✅ High in Healthy Fats – Using natural peanut butter, coconut oil, or Greek yogurt provides heart-healthy fats instead of processed oils.
✅ Lower Sugar – Swapping out refined sugar for natural sweeteners (honey, maple syrup, or dates) helps prevent sugar spikes.
✅ More Fiber & Nutrients – Oat flour and almond flour add fiber, protein, and essential vitamins compared to white flour.
✅ Less Processed Chocolate – Using dark chocolate (70% cocoa or higher) provides antioxidants and less sugar.
Healthy Substitutions for Special Diets
| Dietary Need | Modification |
|---|---|
| Gluten-Free | Use oat flour or almond flour instead of all-purpose flour |
| Low-Sugar | Replace honey with stevia or monk fruit sweetener |
| Vegan | Swap honey for maple syrup and use dairy-free dark chocolate |
| High-Protein | Add 1 scoop of vanilla or chocolate protein powder to the base |
Storage Tips
- Refrigerator: Store in an airtight container for up to 7 days.
- Freezer: Freeze individual bars for up to 3 months and thaw as needed.
This healthier version of Lunch Lady Peanut Butter Bars keeps all the flavor of the classic recipe without the guilt.
Looking for a fruity dessert pairing? Check out our Strawberries & Cream Pastry Puffs!
No-Bake Lunch Lady Peanut Butter Bars
If you’re looking for a quick and easy way to enjoy Lunch Lady Peanut Butter Bars without turning on the oven, the no-bake version is perfect. These bars have the same delicious peanut butter and chocolate flavors but use graham cracker crumbs (or oats) to create a firm, structured base that doesn’t require baking.
Why Make No-Bake Peanut Butter Bars?
✅ Time-Saving – No need to wait for baking; just mix, chill, and enjoy.
✅ Great for Summer – Keep your kitchen cool without turning on the oven.
✅ Perfect Texture – Soft, creamy peanut butter bars with a firm, chocolatey top.
✅ Fewer Ingredients – Simple pantry staples come together effortlessly.
No-Bake Peanut Butter Bars Recipe
Ingredients
For the Base
- 1 cup peanut butter (creamy or crunchy)
- ½ cup butter (melted)
- 1 ½ cups graham cracker crumbs (or quick oats)
- 1 cup powdered sugar
- 1 teaspoon vanilla extract
For the Chocolate Topping
- 2 cups semi-sweet or dark chocolate chips
- 2 tablespoons butter or coconut oil
Step-by-Step Instructions
Step 1: Make the Peanut Butter Base
- In a large mixing bowl, stir together melted butter, peanut butter, vanilla extract, and powdered sugar until smooth.
- Add graham cracker crumbs (or quick oats) and mix until fully combined.
- Press the mixture evenly into a 9×13-inch baking pan lined with parchment paper.
Step 2: Add the Chocolate Layer
- In a microwave-safe bowl, melt the chocolate chips and butter in 30-second intervals, stirring between each until smooth.
- Pour the melted chocolate over the peanut butter base and spread evenly with a spatula.
Step 3: Chill and Slice
- Refrigerate the bars for at least 1 hour until the chocolate is fully set.
- Once firm, remove from the pan and cut into squares.
No-Bake vs. Baked: What’s the Difference?
| Feature | No-Bake Version | Baked Version |
|---|---|---|
| Texture | Soft, slightly chewy, firm when chilled | Chewy and slightly cakey |
| Time | Quick, no oven needed | Requires baking (18-22 minutes) |
| Ingredients | Graham crackers or oats instead of flour | Flour-based, more structured |
| Best For | Easy, hassle-free treats | A classic peanut butter bar |
Tips for Perfect No-Bake Peanut Butter Bars
✅ Use finely crushed graham crackers – This helps create a smooth, firm base.
✅ For a firmer bar, increase powdered sugar – More powdered sugar makes the bars hold together better.
✅ Refrigerate before slicing – This keeps the chocolate from cracking when you cut the bars.
✅ Use dark chocolate for a richer flavor – Dark chocolate (70% cocoa or higher) balances the sweetness.
How to Store No-Bake Peanut Butter Bars
- Refrigerator: Store in an airtight container for up to 7 days.
- Freezer: Freeze for up to 3 months, then thaw at room temperature before eating.
No-bake Lunch Lady Peanut Butter Bars are the ultimate easy dessert that anyone can make in minutes.
Peanut Butter Frosting for an Extra Touch
If you’re a true peanut butter lover, adding a rich, creamy peanut butter frosting to Lunch Lady Peanut Butter Bars takes them to the next level. Instead of a chocolate topping, this version features a smooth, sweet, and slightly salty peanut butter frosting that complements the chewy base perfectly.
Why Choose Peanut Butter Frosting?
✅ Extra Creamy & Rich – Doubles the peanut butter flavor in every bite.
✅ Perfect for Those Who Prefer Less Chocolate – A great alternative for non-chocolate lovers.
✅ Smooth & Velvety Texture – Creates a soft, melt-in-your-mouth experience.
✅ Customizable – Adjust the sweetness or texture by tweaking the ingredients.
Peanut Butter Frosting Recipe
Ingredients
- ½ cup butter (softened)
- 1 cup peanut butter (creamy)
- 1 ½ cups powdered sugar
- ¼ cup milk or heavy cream (adjust for desired consistency)
- 1 teaspoon vanilla extract
- ¼ teaspoon salt (optional, enhances flavor)
Step-by-Step Instructions
Step 1: Mix the Ingredients
- In a mixing bowl, beat butter and peanut butter together until smooth and creamy.
- Gradually add powdered sugar, mixing at low speed to avoid clumping.
Step 2: Adjust the Texture
- Add milk or heavy cream, one tablespoon at a time, until you reach a soft, spreadable consistency.
- Stir in vanilla extract and salt, mixing until fully incorporated.
Step 3: Frost the Bars
- Spread the peanut butter frosting evenly over the cooled peanut butter base.
- For a fancier finish, use a spatula to create swirls or ridges in the frosting.
- Let the bars sit for about 10 minutes to allow the frosting to set before slicing.
Chocolate vs. Peanut Butter Frosting: Which is Better?
| Feature | Chocolate Topping | Peanut Butter Frosting |
|---|---|---|
| Flavor | Rich and chocolatey | Extra peanut buttery and creamy |
| Texture | Smooth and firm when chilled | Soft and velvety |
| Sweetness | Slightly bitter (if using dark chocolate) | Sweeter and more balanced |
| Best For | Classic peanut butter bars lovers | Those who want more peanut butter flavor |
Customizations & Flavor Twists
🌿 Healthier Frosting: Use Greek yogurt instead of butter for a lighter version.
🍯 Naturally Sweetened: Swap powdered sugar for honey or maple syrup for a more natural sweetness.
🍫 Chocolate-Peanut Butter Swirl: Mix in 2 tablespoons of cocoa powder to make a peanut butter-chocolate frosting.
🥜 Extra Crunch: Sprinkle chopped peanuts on top for a little texture.
Storage Tips for Frosted Peanut Butter Bars
- Refrigerator: Store in an airtight container for up to 5 days.
- Freezer: Freeze for up to 2 months and thaw at room temperature before serving.
Peanut Butter Frosting adds an irresistible layer of richness to Lunch Lady Peanut Butter Bars, making them creamier and even more indulgent.
Storage, Serving, and Pairing Ideas
Once you’ve made your Lunch Lady Peanut Butter Bars, knowing how to store, serve, and pair them can make them even more enjoyable. Whether you’re saving them for later or serving them at an event, here’s how to keep them fresh and delicious.
Best Ways to Store Lunch Lady Peanut Butter Bars
To maintain the perfect texture and flavor, follow these storage tips:
| Storage Method | How to Store | Shelf Life |
|---|---|---|
| Room Temperature | Store in an airtight container at cool room temperature | 2-3 days |
| Refrigerator | Keep in a sealed container to maintain freshness | 5-7 days |
| Freezer | Wrap each bar individually and store in a freezer-safe bag | Up to 3 months |
Pro Tips:
✅ For softer bars, store at room temperature.
✅ For firmer bars, store in the fridge and let them sit at room temp for a few minutes before eating.
✅ To freeze, place a piece of parchment paper between layers to prevent sticking.
How to Serve Peanut Butter Bars for Different Occasions
Lunch Lady Peanut Butter Bars are great on their own, but here are some fun serving ideas:
🎉 For Parties & Events – Cut into bite-sized squares, serve on a platter, and drizzle with extra melted chocolate.
☕ With Coffee or Tea – Pair with black coffee, cappuccino, or a cup of chai for a rich, nutty contrast.
🍦 As a Dessert Topping – Crumble bars over vanilla ice cream or mix into a sundae.
🥛 Classic Milk Pairing – Serve with a cold glass of milk (regular, almond, or oat milk).
🍓 With Fresh Fruit – Add sliced bananas or strawberries on the side for a fresh balance.
Creative Flavor Pairings
Pairing these bars with the right drinks or add-ons can enhance their flavor:
| Pairing | Why It Works |
|---|---|
| Dark Roast Coffee | Balances the sweetness with a bold, slightly bitter contrast. |
| Almond or Coconut Milk | Complements the nutty peanut butter flavors. |
| Fresh Strawberries | Adds a juicy, tart contrast to the richness. |
| Salted Caramel Drizzle | Enhances the sweet and salty combo. |
| Chocolate Ice Cream | Doubles up on the chocolate-peanut butter goodness. |
How to Keep Bars from Melting or Getting Too Hard
- For warm weather: Store bars in the fridge to prevent the chocolate from melting.
- For colder weather: Let bars sit at room temperature for 5-10 minutes before eating to soften slightly.
Final Thoughts: Enjoying Lunch Lady Peanut Butter Bars Anytime
Whether you prefer the classic version, no-bake, graham cracker, or a healthier alternative, these bars remain a timeless favorite. Their creamy peanut butter flavor, chewy base, and rich chocolate topping make them the ultimate comfort treat.

Lunch Lady Peanut Butter Bars served with a glass of milk.
FAQs
1. Can I make Lunch Lady Peanut Butter Bars without baking?
Yes! For a no-bake version, replace the flour-based base with graham cracker crumbs or quick oats mixed with melted butter, peanut butter, and powdered sugar. Press the mixture into a pan, then add the peanut butter and chocolate layers before chilling to set.
2. How do I use graham crackers in Lunch Lady Peanut Butter Bars?
You can replace some or all of the flour in the cookie base with crushed graham crackers. This adds a light crunch and a subtle honey flavor. For a no-bake version, use graham cracker crumbs as the full base and skip baking altogether.
3. Are there healthy versions of Lunch Lady Peanut Butter Bars?
Yes! You can make healthier bars by:
✅ Using natural peanut butter (no added sugar or oils).
✅ Replacing white flour with oat flour or almond flour.
✅ Substituting honey, maple syrup, or coconut sugar for refined sugar.
✅ Using dark chocolate (70% cocoa or higher) instead of milk chocolate.
4. What’s the old-school peanut butter bars recipe?
The original Lunch Lady Peanut Butter Bars were made with:
Butter, sugar, eggs, peanut butter, flour, and baking soda for the base.
A smooth peanut butter layer.
A melted chocolate topping.
This classic recipe is still widely loved today!
5. How do I make peanut butter frosting for these bars?
To replace the chocolate topping with peanut butter frosting:
Beat together ½ cup butter, 1 cup peanut butter, 1 ½ cups powdered sugar, ¼ cup milk, and 1 teaspoon vanilla until smooth.
Spread evenly over the cooled peanut butter base before slicing.
Conclusion
Lunch Lady Peanut Butter Bars are a timeless dessert that brings back nostalgic memories of school cafeteria treats. Their chewy peanut butter base, smooth filling, and rich chocolate topping make them an all-time favorite.
In this article, we covered everything you need to know about these delicious bars, including:
✅ The history of Lunch Lady Peanut Butter Bars.
✅ Classic and alternative recipes, including no-bake, graham cracker, and healthier versions.
✅ Step-by-step instructions to make them perfectly.
✅ Storage, serving, and pairing ideas to enjoy them anytime.
✅ Frequently asked questions to help with common recipe concerns.
Whether you stick to the original recipe or experiment with different variations, these bars are guaranteed to be a hit at parties, family gatherings, or just as a sweet treat for yourself.
Now it’s your turn! Try making these Lunch Lady Peanut Butter Bars at home and let us know your favorite variation!